Monday 27 April 2020

DIY POM POM CHICKEN / ROOSTER / YARN CHICK

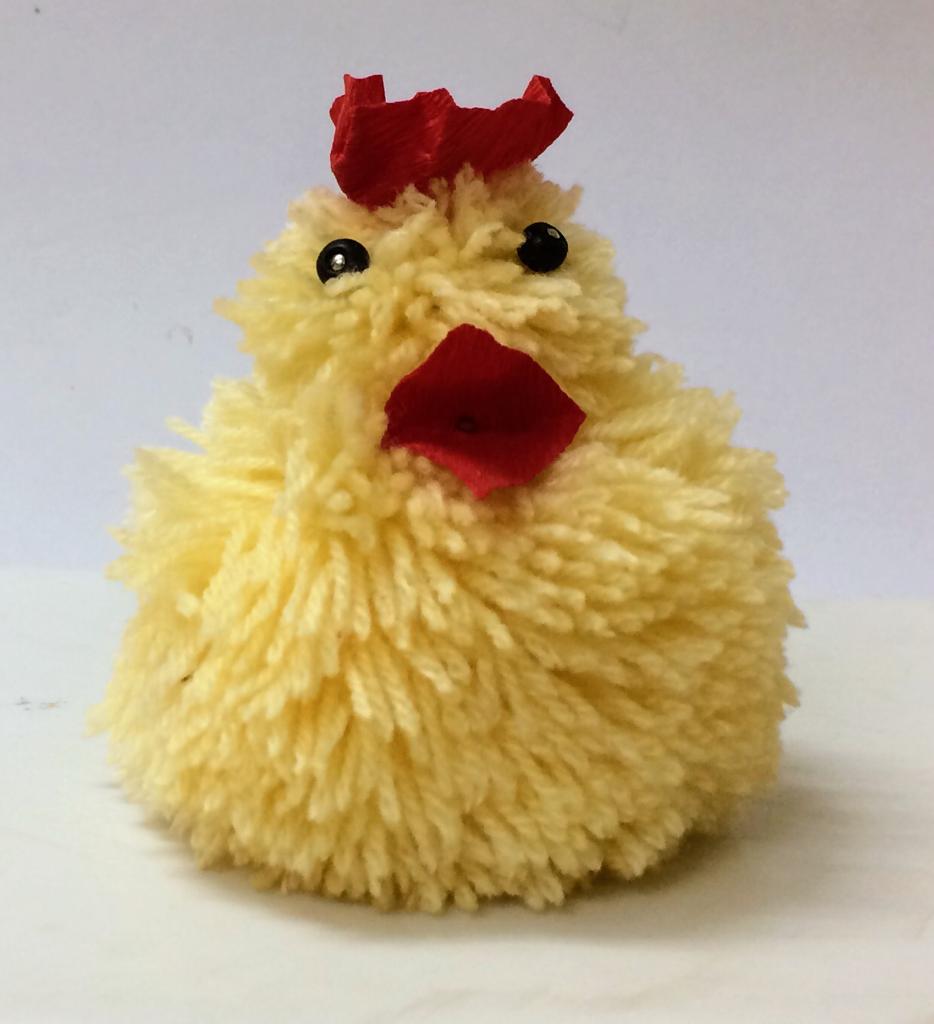
Pom Pom(s) are soft and friendly, so it makes a lot of sense to make some Pom Pom Soft Toys, Craft Projects, Super Cute Baby Presents, and use them for Creative Imaginative Play.


MATERIALS  YOU  NEED :

1. Yellow Wool Yarn
2. Cardboard
3. Scissors
4. Big Needle / Hot Glue Gun / Adhesive
5. Two Black Beads and Three Pins / Googly Eyes
6. Red Colour Cloth / Crape Paper / Foam Sheet

HOW  TO  MAKE :


1. To make the template, draw and cut two circles of diameter 7 cm. and two circles of diameter 4 cm. on the cardboard.

2. Now draw small circle of 1.5 cm. diameter on the big shapes and 1.0 cm. on the small shapes in the center and remove that part.

3. Cut the slit at one place as per image above on each shape.

4. Take pair of big templates, keep the slits at opposite sides and wrap the cardboards with  wool yarn using big needle. Continue it till the central hole is filled up.


5. Now cut the wool yarn edges with scissors.


6. Take two strings of yarn about 12 inches long, place in between the two cardboards and tie firmly, repeat it two times.

7. Now take out one cardboard from slit and then the other one.

8. Here is your Pom Pom, you can trim the uneven strings.

9. Repeat this process for the other pair of cardboards.


10. To attach both the Pom Pom(s), if you are using hot glue gun, then you can stick the smaller part near the edge of bigger part, but if using needle and yarn, you have to keep the small one on the big at the centre to insert the needle to both and attach them and tie the knot firmly.


11. Eyes, beak, and feet can also be fixed with glue gun otherwise with the help of pins you can insert eyes, beak and crown to the small Pom Pom.

12. If using glue gun, feet can be attached under the big part, but it’s optional.

Hope you enjoy making it !
You can explore with different size and colours.

Friday 17 April 2020

D I Y HOMEMADE CANDLES

Candles are a great way to bring light and fragrance into a room and making them yourself is a fun craft project. Candles can truly be very meditative and thought provoking. There are endless ways to customise your candles .So get creative and don’t be afraid to experiment. Happy crafting !

Floating Candles
                                                         

MATERIALS  YOU  NEED :

  1. Paraffin wax or Soy wax(natural product)
  2. Wicks  with metal base or thick thread 
  3. Mould such as small glass , Jars or tin containers    Or  Terracotta  Diyas    Or   Removable  mould i.e  metal dishes with shallow depth , paper cups , paper glass   Or Commercial metal moulds for stand candles / floating candles (available in market 

  4. A double boiler ( one large pot and one small pot or kettle)
  5. Scents / fragrance oil (optional)
  6. Colouring agents (optional) /chopped wax crayons 
  7. Spatula  or Spoon ,  Knife  
  8. Cooking oil and brush
  9. Wooden sticks / pencil / large clip
  10. Metal tray
  11. News paper or old cloth to protect the work place
  12. Water

HOW  TO  MAKE :
  1. Set up newspapers around your work area .
  2. Measure out how much wax you would need to fill your container or mould, then double it. That’s how much wax you will need to melt.
  3. To melt the wax , put good amount of water in the bottom pan and put wax chunks in the double boiler or small pot / kettle. Stir it and break up big chunks with spatula.
  4. Adhere wick to the container or mould , which will depends on the type and size of container TERRACOTTA  DIYA : Paint and dry before pouring the melted wax , as it has shallow depth, you can easily put wick into wax and adhere the metal base by holding the other end of wick. 

MOULDS (JARS or TIN CONTAINER , GLASS) : 


Some wicks have a little sticker built in , on the bottom but most do not , then dip the metal tab of the wick into that melted wax , then quickly adhere it to the bottom of the container , as the wax hardens, it’ll be stuck solid to the bottom. Tie the other top end of wick to a stick / pencil and put it on the brim of the container. 
REMOVABLE  MOULDS : Grease the inner side of mould such as paper cups or metal dishes with narrow base and broad opening, using cooking oil and brush before fixing the wick as it will help to remove the mould after cooling the wax candle. 
COMMERCIAL METAL MOULDS :  As this type of moulds have two parts and clamps so at first clean the mould’s inner part and grease both parts with cooking oil and brush and tie the thick thread to the bottom and top of one mould at the specific place for it .Cover the other part on it and use clamps to tightly secure both parts together before pouring the melted wax.


  1. Add colour and mix it properly by stirring then add fragrance according to the prescribed directions on that bottle . 
  2. Now pour the wax into container or mould. Keep the light hold on the wick so that it stays in the center. Don’t pour all the wax just yet, though, you’ll notice that it generally gets a sinkhole in the centre, as the wax sets . Reheat the wax that you left in the pot and top off the candle. Please , don’t add too much or you may end up with another hole, just fill in the depression. 
  3. Trim Wick down to just about 1/4” .
  4. Clean up the wax by wiping the wax away with paper towel while it’s still in liquid form or use disposable rag.  
Enjoy your candle !


Saturday 11 April 2020

WOODEN MOSAIC WALL HANGING / PANEL (DIY)

Wooden mosaic wall hanging or panel can enhance the interior environment. By using various shapes, size, colour and grain of wood you can create a really interesting Wooden Mosaic Art piece. Anything from wooden buttons, blocks, slates, uneven wood pieces, and other embellishments can create a beautiful piece. You can make it as interesting and eclectic as you like.


MATERIALS  YOU  NEED:
  1. Ply Board or MDF Sheet for Frame 
  2. Pieces or Blocks of thin wooden sheets in different natural shades and piece of ply wood
  3. Wood cutter or blade 
  4. Flint paper or sand paper 
  5. Black paint or spray 
  6. Three shades of brown colour (optional)
  7. White glue
  8. Lacquer or Clear varnish                  


HOW  TO  MAKE:
  1. Prepare the wooden frame and paint it black.
  2. Sketch the layout of your design on the frame.
  3. It will give good effect , if you have thin sheets of different natural shades, otherwise paint sheets in different shades of brown and dry .
  4. Now cut the wooden sheets or blocks according to the layout and apply sand paper or flint paper on rough edges of blocks.
  5. Place wooden pieces in the layout , make adjustment in your layout to achieve the perfect fit.
  6. Apply white glue under each piece of wood to fix on their place.
  7. Place some heavy item on the wooden pieces to hold them in place.
  8. After fixing and drying the wooden blocks, apply lacquer or clear varnish on the frame and design.
  9. You may compose the design by using cross sectional sliced pieces of different natural colour woods also.

Monday 6 April 2020

DIY MULTIPURPOSE HANGING ORGANISER


It is a useful product with pockets and hooks to keep many things at one place . It can be hanged on wall or inside the cupboard.


MATERIALS  YOU  NEED :
  1. Pieces of thick clothes or jute
  2. Buckram or any plastic sheet for lining 
  3. One wooden round stick or hanger to hang the organiser
  4. Two metal or plastic hooks 
  5. Piece of thick rope for hanging 
  6. Acrylic colours, brush and buttons 

HOW  TO  MAKE :


  1. Cut the base cloth by adding one inch to the length of wooden stick or hanger in width and 28 inches in length. 
  2. Size of my organiser is 18x24 inches. Size of pockets are 5x10 inches , 5x16 inches and 8x16 inches.
  3. For above mentioned size of pockets you have to cut the clothes in size 6x14 inches, 6x22 inches, 9x20 inches.
  4. Stitch lining to the base cloth and pieces of pockets.
  5. Fold and stitch the upper edge of base cloth with the appropriate gap , so that you can insert the stick for hanging.
  6. Fold and stitch upper edge of each pocket cloth.
  7. As per the image of organiser , Box Pleat the pocket pieces not only in the middle but also at the edges of pocket clothes and stitch according to the above image. 
  8. Cut two pieces of cloth in size 2x3 inches to make the strips to attach two hooks on the organiser. 
  9. Tie piece of rope on the ends of stick for hanging.
  10. By using Acrylic colours and buttons decorate the multipurpose hanging organiser.


Saturday 28 March 2020

DIY HANGING PAPER LAMPSHADE / LANTERN


A Lampshade’s purpose is to protect the eye from the bulb’s glare and to direct light from the bulb in the lamp into room . 
Paper Lampshades that surround the whole bulb disperse light more diffusely , rather than in a particular focus area . These , then , are more useful as a decoration items .


MATERIAL YOU NEED : 
  1. Cardboard 
  2. Wax paper / Rice paper /Any other sturdy paper
  3. Thick thread and big needle
  4. Punching tool
  5. Any coloured or decorative paper
  6. Paper cutter and white glue.   


HOW TO MAKE :

Step 1:  Cut four cardboards in the size of 9x12 inches each and draw border of one inch.
Step 2:  Now remove the inner part of cardboards by cutting from each one to make the frames . 
Step 3:  Cover and glue the borders of all frames on outer side with decorative paper.
Step 4:  After drying the frames you can make equal numbers of holes with punching tool on two opposite edges of each frame .


Step 5:  Now with needle and thread or directly only using thick thread by joining two frames at a time, join the four frames to form the structure. 
Step 6:  Measure size of inside edges of frames and cut the wax paper or rice paper , one inch bigger on each side of measurement.
Step 7:  Apply white glue on the inner side of frames and paste the wax paper from inside the frame structure. 
Step 8:  Attach four long threads on each corner, and tie them together at some distance and hang it.


Tuesday 17 March 2020

Handmade Greeting Cards (DIY)


Handmade Greeting Cards work as a bridge which connects two hearts, emotions, feelings to people you care about.
Materials you need are as listed down under each theme.


Theme : Holi Greeting Card

Media: Ivory sheet, Art form: Cutting and pasting, Tools: Coloured papers , Acrylic colours (red and white), thin round brush, scissors, glue

Tips :


  1. To get the exact shapes it is suggested to make the stencil of shapes.
  2. For red dots and white design use of acrylic colours give good results.


Theme  : Birthday Card

Media:  Ivory sheet, Art Form: Mix Tools : glass colours, acrylic colours and thin marker, thin round brush

Tips:
 1. First draw basket and than start making flowers from bottom to top.
 2. Now paint leaves and stem etc with green acrylic colour.
 3. At last make pollens with acrylic colours.
 4.  Flowers are made by finger.


Put drops of colour and spread with finger to make the petals.


Theme :  Indian Republic Day Card

Media :Ivory sheet , Art form: Mix , Tools: Acrylic colours , brush , Marker for Calligraphy.

Tips:
 1. First paint the background then paint the three colours.
 2. Use marker for writing.


Theme :  Independence Day Card (India)

Media:  Card Paper,   Art Form:  Acrylic Painting,   Tools:  Acrylic Colours and brushes .


Theme :  Birthday Cards for Kids

Media:  Ivory sheet / Thick Handmade paper ,  Art Form:  Acrylic Colours and brush ,  Thin marker.

Tips:
 1. Apply thin layer of colour on your thumb with brush , try the impression on extra sheet , lines of thumb impression should be visible on the print.
 2. After practice , you can print on the card.


Theme :   Christmas  Greeting Card

Media :  Ivory Sheet or Card Paper,  Art Form :  Mix  ,   Tools:  Acrylic Colours and brushes , thin marker, dry leaves.

Tips:
 1. To paint upper part of this tree either you have fan brush or use old flat brush with wear out brush hair.


Theme:   Diwali Greeting Cards

Media: Ivory  Sheet , Art Form :  Painting ,  Tools :  Fluoroscent Colour or any other colour and brush.

Tips:
 1. To get the accuracy you can draw with pencil and than colour it.


Theme :  Wedding Card / Anniversary Card

Media :  Ivory Sheet ,  Art Form : Gond Painting ( Folk / Tribal Art of Madhaya Pradesh),  Tools:  Acrylic Colours and brush , Water proof black ink pen.

Tips:
 1. Divide the picture in parts and colour with different colours.
 2. With black pen fill each part with different strokes to get 3D effect.
 3. For more details ,please visit my old post on Gond Painting dated :03.08.2015.

Sunday 8 January 2017

FELT FABRIC FLOWERS - DIY


MATERIALS YOU NEED:
  1. Felt Fabric
  2. Scissor
  3. Stapler
  4. Paper Template


HOW TO MAKE:

Step 1 : Select Different Colors of Fabrics & Cut as per the TEMPLATE given above.


Step 2 : Follow the TEMPLATE given above to score cuts / indents to the different sizes of fabric in-circles.


Reference to the cut sectors into the fabric circles (placed in alternate colors as per flower design)


Step 3 : Flip backwards & fold the cut sectors to make 8 cone shaped petals out of the circular pattern of different sizes.


Step 4 : Secure the conical petal structure using paper stapler. Do it for all the 8 cut sectors of the circular pattern.


Step 5 : Assort & centre the different sizes of the petals & align so that the successive petal cone comes in between to the previous petal void space. (Refer to the image below for placement visualisation).
Step 6 : Secure the multiple levels of the petal structures, using fabric glue or button pins to impart the look & representation of a flower pollen using a brooch / fabric stitch / fabric knot etc.