Monday, 30 May 2016

GREETING CARD MAKING

A greeting card is an illustrated , card with an expression of emotions . They are effective tools to communicate important feelings to people you care about. 
Greeting card works as a bridge which connects two hearts, emotions, feelings. If its handmade it will be the “icing on the cake” while expressing your love, sentiments, whatever it may be. Everyone feels special when they receive an unexpected card in the mail or in person. 

MATERIALS YOU NEED:
As listed down under each card.

Media : Handmade Paper ; Art Form : Quilling ; Tools : Toothpick, White Glue, Quilling Stripes


Media : Handmade Paper ; Art Form : Quilling ; Tools : Toothpick, White Glue, Quilling Stripes

Media : Card Paper ; Art Form : Thread Art ; Tools : Silk Thread, Needle, Pencil (for outline)


Media : Card Paper ; Art Form : Thread Painting ; Tools : Thread, Poster Colours, Brush

Media : Card Paper ; Art Form : Vegetable Block Painting ; Tools : Lady Finger Vegetable, Knife, Poster Colour


Media : Card Paper ; Art Form : Vegetable Block Painting ; Tools : Potato Vegetable, Knife, Poster Colour


Media : Black Mounting Sheet ; Art Form : Up-cycled Painting ; Tools : Pencil Shavings, Sequins, Mirrors, Sketch Pen, White Glue


Media : Card Paper ; Art Form : Madhubani Painting ; Tools : Coloured Pens


Media : Handmade Papers ; Art Form : Up-cycled Painting ; Tools : Embroidery Threads, Sequins, Glitters, White Glue 


Media : Card Paper ; Art Form : Madhubani Painting ; Tools : Sketch Pens


Media : Handmade Papers ; Art Form : Leaf Painting ; Tools : Dry Leaves, White Glue, Pen


Media : Cartage Sheet, Glaze Paper ; Art Form : Thumb Painting ; Tools : Poster Colours, Black Sketch Pen, White Glue, Scissors


Media : Card Paper ; Art Form : Hand Painting ; Tools : Fist Imprint, Poster Colours, Sketch Pen


Media : Card Paper ; Art Form : Painting ; Tools : Poster Colours, Paint Brush


Media : Card Paper ; Art Form : Sketch Painting ; Tools : Golden Sketch Pen, Grey Tape


Media : Card Paper ; Art Form : Figurine Painting ; Tools : Poster Colours, Ribbon, Glitters, Net Fabric, Sketch Pen, White Glue


Media : Handmade Paper ; Art Form : Block Painting ; Tools : Design Blocks, Black Poster Colour, Pencil Colours, Paint Brush


Media : Card Paper ; Art Form : Pencil Shading Painting ; Tools : Pencil


Media : Card Paper ; Art Form : Mixed Media ; Tools : Sequins, Red Ribbon, Poster Colours, Paint Brush, White Glue


Media : Card Paper ; Art Form : Mixed Media ; Tools : Sequins, Golden Ribbon, Poster Colours, Paint Brush, White Glue, Wrapping Paper, Scissors

Monday, 23 May 2016

PAPER MACHE BALLOON CRAFT


Paper mache is a popular method of creating three dimensional projects. Paper bound with a strong adhesive dries into a sturdy shell that takes the form of its mould. In this procedure a balloon is used as the mould for the paper mache. The balloon shaped paper mache can be decorated into a mini hot air balloon, Easter eggs, paper mache animals, and other paper mache projects.


MATERIALS YOU NEED:
1. Balloons of  different shape and size
2. Scrap of news paper 
3. Some sheets of thin white paper or tissue paper
4. Piece of stiff paper
5. Glue or paste ( prepared by mixing fine wheat flour with water in the ratio of 1:4 and heating it till its colour changes ; add pinch of salt also in it )
6. Poster colours or acrylic colours
7. Brushes


HOW TO MAKE:
1. Inflate the balloon and put the knot.
2. Tear the piece of news paper into small bits .
3. Dip the piece of paper in gum or paste whatever you are using. And, paste it onto the balloon. Continue pasting the pieces of news paper overlapping on some edges till it covers the balloon surface.
4. Repeat same  process for the next layer of newspaper pieces.
5. Eight layers of news paper pieces and one layer of white thin paper make a stiff shape after drying.
6. After drying of basic shape create other fetchers either by cutting and pasting the stiff paper or by meshing the pieces of paper and pasting on the base and keep aside to dry it .
7. After drying , colour it as you wish to make them realistic or funny. It's your World of Imagination after all !!


Saturday, 14 May 2016

POPSICLE STICK ART


Popsicle sticks are easily available in various shapes and a raw material for creating fantastic craft ideas.


MATERIALS YOU NEED:
1. Popsicle sticks of different size and shape
2. Card board / M d f sheet / piece of ply board
3. White glue or adhesive
4. Clear varnish , Acrylic colour
5. Brush


HOW TO MAKE:
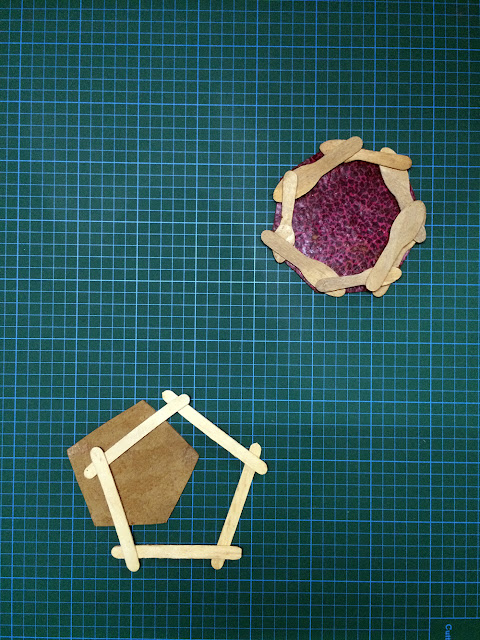
  • Cut the card board to make the base of container in the required shape i.e .four or five or six sides.
  • Place the Popsicle sticks on the edges of base board as per your design by overlapping the one Popsicle sticks to the other on edges , when you are satisfied dab white glue on each Popsicle sticks and paste them on the board.
  • Repeat same process for the next row.
  • Placement of the Popsicles in each row depend on your design , it may be straight or towards inside or towards outside to make the narrow or broad size of the structure or vase.
  • Repeat till you get the desired height and shape and dry it .
  • After drying of adhesive  you may varnish it or make it colourful by applying acrylic colours. 


Popsicle Bird 
  • Kids can easily make two dimensional birds on the flat surface just by pasting
  • Popsicles overlapping as per the required shape. 
  • Acrylic colours make the birds more attractive, otherwise varnish will make them shine.
Explore more shapes of birds and enjoy it.