Monday, 27 April 2020

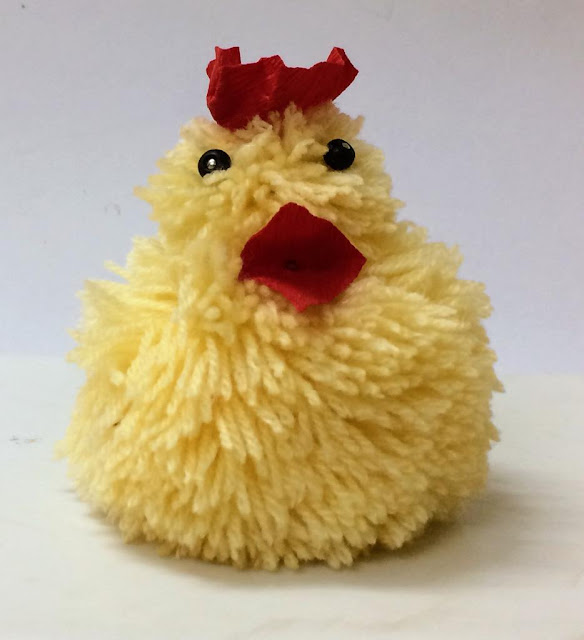
DIY POM POM CHICKEN / ROOSTER / YARN CHICK

Pom Pom(s) are soft and friendly, so it makes a lot of sense to make some Pom Pom Soft Toys, Craft Projects, Super Cute Baby Presents, and use them for Creative Imaginative Play.


MATERIALS  YOU  NEED :

1. Yellow Wool Yarn
2. Cardboard
3. Scissors
4. Big Needle / Hot Glue Gun / Adhesive
5. Two Black Beads and Three Pins / Googly Eyes
6. Red Colour Cloth / Crape Paper / Foam Sheet

HOW  TO  MAKE :


1. To make the template, draw and cut two circles of diameter 7 cm. and two circles of diameter 4 cm. on the cardboard.

2. Now draw small circle of 1.5 cm. diameter on the big shapes and 1.0 cm. on the small shapes in the center and remove that part.

3. Cut the slit at one place as per image above on each shape.

4. Take pair of big templates, keep the slits at opposite sides and wrap the cardboards with  wool yarn using big needle. Continue it till the central hole is filled up.


5. Now cut the wool yarn edges with scissors.


6. Take two strings of yarn about 12 inches long, place in between the two cardboards and tie firmly, repeat it two times.

7. Now take out one cardboard from slit and then the other one.

8. Here is your Pom Pom, you can trim the uneven strings.

9. Repeat this process for the other pair of cardboards.


10. To attach both the Pom Pom(s), if you are using hot glue gun, then you can stick the smaller part near the edge of bigger part, but if using needle and yarn, you have to keep the small one on the big at the centre to insert the needle to both and attach them and tie the knot firmly.


11. Eyes, beak, and feet can also be fixed with glue gun otherwise with the help of pins you can insert eyes, beak and crown to the small Pom Pom.

12. If using glue gun, feet can be attached under the big part, but it’s optional.

Hope you enjoy making it !
You can explore with different size and colours.
Friday, 17 April 2020

D I Y HOMEMADE CANDLES

Candles are a great way to bring light and fragrance into a room and making them yourself is a fun craft project. Candles can truly be very meditative and thought provoking. There are endless ways to customise your candles .So get creative and don’t be afraid to experiment. Happy crafting !

Floating Candles
                                                         

MATERIALS  YOU  NEED :

  1. Paraffin wax or Soy wax(natural product)
  2. Wicks  with metal base or thick thread 
  3. Mould such as small glass , Jars or tin containers    Or  Terracotta  Diyas    Or   Removable  mould i.e  metal dishes with shallow depth , paper cups , paper glass   Or Commercial metal moulds for stand candles / floating candles (available in market 

  4. A double boiler ( one large pot and one small pot or kettle)
  5. Scents / fragrance oil (optional)
  6. Colouring agents (optional) /chopped wax crayons 
  7. Spatula  or Spoon ,  Knife  
  8. Cooking oil and brush
  9. Wooden sticks / pencil / large clip
  10. Metal tray
  11. News paper or old cloth to protect the work place
  12. Water

HOW  TO  MAKE :
  1. Set up newspapers around your work area .
  2. Measure out how much wax you would need to fill your container or mould, then double it. That’s how much wax you will need to melt.
  3. To melt the wax , put good amount of water in the bottom pan and put wax chunks in the double boiler or small pot / kettle. Stir it and break up big chunks with spatula.
  4. Adhere wick to the container or mould , which will depends on the type and size of container TERRACOTTA  DIYA : Paint and dry before pouring the melted wax , as it has shallow depth, you can easily put wick into wax and adhere the metal base by holding the other end of wick. 

MOULDS (JARS or TIN CONTAINER , GLASS) : 


Some wicks have a little sticker built in , on the bottom but most do not , then dip the metal tab of the wick into that melted wax , then quickly adhere it to the bottom of the container , as the wax hardens, it’ll be stuck solid to the bottom. Tie the other top end of wick to a stick / pencil and put it on the brim of the container. 
REMOVABLE  MOULDS : Grease the inner side of mould such as paper cups or metal dishes with narrow base and broad opening, using cooking oil and brush before fixing the wick as it will help to remove the mould after cooling the wax candle. 
COMMERCIAL METAL MOULDS :  As this type of moulds have two parts and clamps so at first clean the mould’s inner part and grease both parts with cooking oil and brush and tie the thick thread to the bottom and top of one mould at the specific place for it .Cover the other part on it and use clamps to tightly secure both parts together before pouring the melted wax.


  1. Add colour and mix it properly by stirring then add fragrance according to the prescribed directions on that bottle . 
  2. Now pour the wax into container or mould. Keep the light hold on the wick so that it stays in the center. Don’t pour all the wax just yet, though, you’ll notice that it generally gets a sinkhole in the centre, as the wax sets . Reheat the wax that you left in the pot and top off the candle. Please , don’t add too much or you may end up with another hole, just fill in the depression. 
  3. Trim Wick down to just about 1/4” .
  4. Clean up the wax by wiping the wax away with paper towel while it’s still in liquid form or use disposable rag.  
Enjoy your candle !


Saturday, 11 April 2020

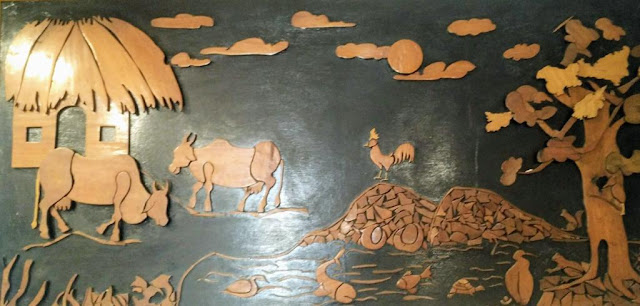
WOODEN MOSAIC WALL HANGING / PANEL (DIY)

Wooden mosaic wall hanging or panel can enhance the interior environment. By using various shapes, size, colour and grain of wood you can create a really interesting Wooden Mosaic Art piece. Anything from wooden buttons, blocks, slates, uneven wood pieces, and other embellishments can create a beautiful piece. You can make it as interesting and eclectic as you like.


MATERIALS  YOU  NEED:
  1. Ply Board or MDF Sheet for Frame 
  2. Pieces or Blocks of thin wooden sheets in different natural shades and piece of ply wood
  3. Wood cutter or blade 
  4. Flint paper or sand paper 
  5. Black paint or spray 
  6. Three shades of brown colour (optional)
  7. White glue
  8. Lacquer or Clear varnish                  


HOW  TO  MAKE:
  1. Prepare the wooden frame and paint it black.
  2. Sketch the layout of your design on the frame.
  3. It will give good effect , if you have thin sheets of different natural shades, otherwise paint sheets in different shades of brown and dry .
  4. Now cut the wooden sheets or blocks according to the layout and apply sand paper or flint paper on rough edges of blocks.
  5. Place wooden pieces in the layout , make adjustment in your layout to achieve the perfect fit.
  6. Apply white glue under each piece of wood to fix on their place.
  7. Place some heavy item on the wooden pieces to hold them in place.
  8. After fixing and drying the wooden blocks, apply lacquer or clear varnish on the frame and design.
  9. You may compose the design by using cross sectional sliced pieces of different natural colour woods also.

Monday, 6 April 2020

DIY MULTIPURPOSE HANGING ORGANISER


It is a useful product with pockets and hooks to keep many things at one place . It can be hanged on wall or inside the cupboard.


MATERIALS  YOU  NEED :
  1. Pieces of thick clothes or jute
  2. Buckram or any plastic sheet for lining 
  3. One wooden round stick or hanger to hang the organiser
  4. Two metal or plastic hooks 
  5. Piece of thick rope for hanging 
  6. Acrylic colours, brush and buttons 

HOW  TO  MAKE :


  1. Cut the base cloth by adding one inch to the length of wooden stick or hanger in width and 28 inches in length. 
  2. Size of my organiser is 18x24 inches. Size of pockets are 5x10 inches , 5x16 inches and 8x16 inches.
  3. For above mentioned size of pockets you have to cut the clothes in size 6x14 inches, 6x22 inches, 9x20 inches.
  4. Stitch lining to the base cloth and pieces of pockets.
  5. Fold and stitch the upper edge of base cloth with the appropriate gap , so that you can insert the stick for hanging.
  6. Fold and stitch upper edge of each pocket cloth.
  7. As per the image of organiser , Box Pleat the pocket pieces not only in the middle but also at the edges of pocket clothes and stitch according to the above image. 
  8. Cut two pieces of cloth in size 2x3 inches to make the strips to attach two hooks on the organiser. 
  9. Tie piece of rope on the ends of stick for hanging.
  10. By using Acrylic colours and buttons decorate the multipurpose hanging organiser.